Thursday, August 30, 2012

Mooo Baaaa Neighhh

My lovely sister in law just had her first baby. Hurray for being an aunt! They have completed their farm themed nursery but were looking for some farm animal silhouettes. Crafty aunt to the rescue. I used my Cameo Silhouette machine to cut her a plethora of farm animals to adorn her nursery walls.

The Cameo is a truly amazing machine allowing one to cut just about any design out. You can draw your own design, scan one in, use a google image or buy ones off the Cameo online store for $.99 each. I choose to buy my farm animals. Here's the Cameo software opening screen. Pop in an animal silhouette....


Send for cutting...


Cut, cut, cut...


This is the animal selection that I ended up with. I added in some picket fence and some farm trucks (not shown) for fun. I'll leave it up to my sister in law to figure out how she'd like to display them! Super cute, fun and easy decorations to make!

To make this blog fun AND informative, I'll give my 2 second review of the Cameo Silhouette machine. I love it. For the most part, it works well and doesn't need a lot of maintenance. However, it is expensive ($300) and the blade and cutting mat are additional. My main complaint is that it seems like I have to replace the blade and mat pretty often - which can add up. Otherwise, the creative possibilities are endless. See some other crafts I've done with my Cameo (and other supplies).


Come back often for new Cameo projects!

Visit my etsy shop for even more creations: http://www.etsy.com/shop/LiamLovesLimas


Tuesday, August 28, 2012

Art?? in Atlantic City??

So, the weekend before this last one, I went to Atlantic City for  a bachelorette party. Yes, it was almost everything a bachelorette party should be. But, I was amazed at the art I saw that amused me, intrigued me, or gave me the feeling of having a private joke with someone...


We went to Red Square for dinner, and I was amazed by the concept of a communist themed restaurant in the middle of a casino in Atlantic City! While the food was not my favorite, I loved the art they chose to display, aside from statues of Lenin, there were also great wall paintings of workers.


I loved the lamps and clippings pasted in the bathroom.


We had breakfast "the morning after" at the Bungalow Lounge & Restaurant, and when I went inside form the beachy outdoor seating, I discovered the below wall art.


A lovely and "authentic" ancient Greek frieze.

These items were pretty cool on their own, but this last piece took the cake for me. Titled "Summer,"  this statue by Anthony Frudakis off the Atlantic City boardwalk commissioned by the Tropicana depicts a man in swim trunks running along side a woman in a bathing suit. Her foot is just coming up from the surf, and his hand clasps her waist. With lively leaps, this couple could be said to embody summer love and summer fun at the beach. I feel that you could interpret this work two ways. Either the man and woman are young and in love and running through the surf, or he is pursuing the object of his affection through the surf, the lady an unwilling participant. My friends on this trip all took the first stance--why do I see something sinister in this sculpture?


The energy of this piece and the general stance and motion reminded me of Bernini's Apollo and Daphne. Sure, it is not a direct quote, but I definitely think the artist had that famous sculpture somewhere in his mind. And that's how the echo of sinister got into my mind!


I suppose, in the end, the art in Atlantic City makes you feel the way it was designed to make you feel. You are surrounded by the vague notion of myth and timelessness. You are anywhere and everywhere all at once, but are only partially aware of this sensibility as you travel from one culture, history, country to another, from the beach to the perpetual sunset interior of a world-within-a-world hotel and casino.


Kitsch and camp reign, but for a few moments, you become incredibly drawn in to the magic of the scene....that manufactured mythos among the sand and surf and $5.99 omelette specials...your memories filled with enchantment and the nagging, but temporary thought, "Why did I ever want to leave?"

--Lael


Sunday, August 26, 2012

Goodwill Hunting: Tennis Ball Tree, $5.00


I'm not sure what kind of tree this is meant to resemble, but the fruits look like tennis balls to me! Maybe pears, if you're really squinting. This is another great find from the Goodwill on Padonia Road.

I've noticed a lot of what I'll call Embroidery Art at thrift stores lately. Perhaps this kind of hand-made decoration became really popular a few decades ago and is now finding its way into the secondhand stream, but I can't offer any kind of educated explanation for its ubiquity. This piece stood out because of it's unique design, with lots of negative space and great angles in the tree limbs. Even more interesting is the fact that the directions for making the embroidery are still affixed to the back of the frame, on a separate piece of paper. Presumably recorded by the creator him or herself at the top of the paper, the note reads: "Completed - 2/16/71 C. J. [?] Houston - Baltimore." So we know that this is over 30 years old, and that it was made here in Charm City. On a bit of blue paper pasted to the right of the directions, it's revealed that the work was custom framed by Ludwig Katzenstein, a company still in business today in nearby Lutherville.

The hand-drawn directions don't include any stitch counts or measurements, which would imply that the final product was stitched free-hand (impressive!). The names of the stitches used in embroidery are interesting--padded satin, coral, stem--but seemingly not at all self-explanatory.

What really drew me in when I saw this tree was how it seemed to echo some of the shapes and colors of the Bayeux Tapestry. It wouldn't seem out of place among the other stylized trees that separate the embroidered scenes narrating the Norman conquest of England, and it has inspired me to put down my knitting needles and crochet hooks and give embroidery a go! Maybe in 2050 some poor sap will buy the fruit of my labor--and let's hope it actually looks like fruit--from a futuristic Goodwill store (an oxymoron if ever there was one).

Thursday, August 23, 2012

Thank You, Thank You.

My awesome aunt gave my son, Liam a ton of new toys during a recent visit. A Melissa & Doug donut set, a ice cream play set, an Ikea circus tent and tunnel, a construction hat and a new rug for his room. Anyway, this haul deserved a hand crafted note.

My aunt loves dogs, so I chose this as my inspiration!


Above is a photograph of all the supplies needed. Sans some adhesive zots. The pink tool is a embossing heat gun. It provides a very hot, direct heat for rubber stamp embossing! All my paper supplies are from Paper Source - my favorite for paper products. The cute dancing dog is from a book called '150 Love Notes', a must have for those who enjoy making cards or sending mail/notes.


This was a pretty simple card. I adhered the dancing dog to the yellow (sunshine) A2 sized backing. I applied some light spots of stickles (a glitter glue) to a few of the dog's strips. Just to give pup a little oomph.


Next I stamped a 'thank you' emblem on the outside of the envelope, using a clear stamp pad. I applied a dusting of holographic embossing powder. I held my heat tool about 2 inches away and turned my stamp into a much sweeter embossed design. Read more about heat embossing here.


Finally, I tossed in a pretty peacock envelope liner, adhered to the envelope with double sided tape on either side of the envelope. You can either buy envelope liners, or make your own with any pretty paper you'd like. Here are some envelope templates that are pretty sweet to have.

I double backed the pup by placing a piece of zig zag beige and white paper on the flip side -- with plenty of room for writing!

Thank you note crafting can be fun after all...enjoy!


Tuesday, August 21, 2012

This is why I have no space in my kitchen...I blame you, dessert!


In honor of the fact that today is my birthday, I thought I'd address a very important and serious subject...cake!

Not only does cake taste amazing, you can make it look super awesome! Duh. Anyway, I love to decorate cakes by myself or with my mom (you just have to eat the excess icing while working)!

Also, I am totally obsessed with different shapes of cake pans. My old standby is always a standard bundt pan. But, over the years I have collected a plethora of fun pans, including this amazing tea cake pan. Main downside: sooooo hard to clean! One tip I can definitely give, with this sort of pan, it is NOT worth it to buy an inexpensive one. You want a sturdy pan.


A somewhat recent acquisition: 8 of these Wilton Mini Tasty-Fill™ Cake Pans.


I'm jealous of my mom having this Wilton Checkerboard Cake Set  and her cake "tunnel." The birthday cake she made for herself a few years ago was an igloo with a tunnel inside, ie. filled with delicious frosting! 


My favorite pan is my mini bundt pan.
I like to mix and match for simple but fun desserts for parties. Below, a before and after using the mini bundt pan and little pans (cannot remember what they are called) which make little shallow cake "bowls"! I melted chocolate icing and drizzled (more like dumped) it over the cakes. Then, I dusted with confectioner's sugar.


Below, I used the mini bundt pan again and the tea cake pan noted above to make a summery treat. I used whipped cream, strawberries, and confectioner's sugar to top!


Holiday shaped pans are another collection! I have this pumpkin loaf pan. And my mom always has something amazing in her cabinets!


(Gee, I hope my mom doesn't mind that I keep showcasing her arts and crafts and yummy artsy desserts! Keep 'em coming, Mom...especially the desserts!)


--Lael


Sunday, August 19, 2012

Goodwill Hunting: Librarian, $4.00


I picked this lovely lady up at a recently opened secondhand shop called Rags to Riches in Bellefonte, PA in July. Based on her no-nonsense expression, her fabulous sense of style and the book she holds in her left hand, I've decided to call this piece Librarian. I love her orange striped 1940s shirt dress and brown wedges and wish I could add this look to my own wardrobe (though I could do without the Anne-of-Green-Gables puff sleeves).

This watercolor was painted on a piece of thick art board measuring 10 inches wide by 20 inches high.  It was signed by the artist in the lower left corner; the inscription reads: "Carolyn Zielke - 12." I would guess that the 12 refers to Ms. Zielke's age, or perhaps the grade she was in when she painted this? I'm leaning toward the former theory. The gangly, longer-than-life-size arms and legs suggest that Carolyn was young and still learning how to draw figures with the correct proportions. But there is talent here: for example, the Librarian's skin is incredibly well done. Check out how evenly the wash was applied, and the delicate shading along the left side of all of her limbs--watercolor is not easy to work with, yet the lines are so precise.

I wonder when this was made: in the '40s, as the style of clothing would suggest, or much later? The board is in pretty good condition, with only some slight wear and a few faint stains here and there. Carolyn's beautiful cursive signature makes me think this was made mid-century, when school kids were still drilled in penmanship (a dying art, it seems, because we're typing most of the time now). I wonder if Carolyn had dreams of being a fashion designer, and invented this outfit on her own. The Librarian was one of four drawings by the artist for sale at Rags to Riches. The others included a yawning blond in pink pajamas; a woman in a blue dress; and a woman in an elegant green ball gown. I wish I'd bought the whole set, but it was a cash-only shop and I am so stingy about ATM surcharges.

I hung the Librarian up in my little dressing alcove so that she can inspire me to primp a little harder each morning as I get ready for work. If we're going to be shushing people all day, we might as well do it wearing gorgeous red lipstick and glossy pin curls!

Saturday, August 18, 2012

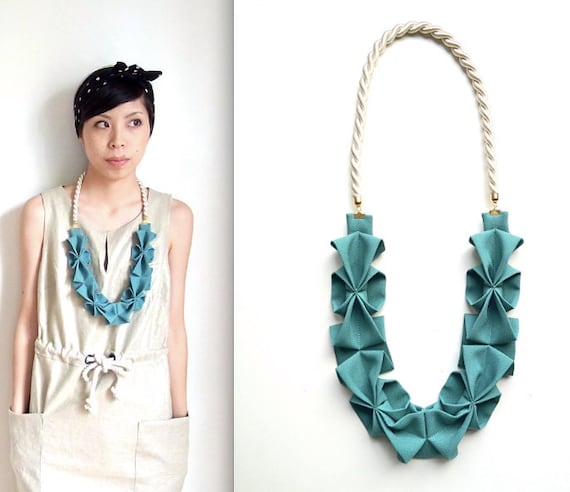
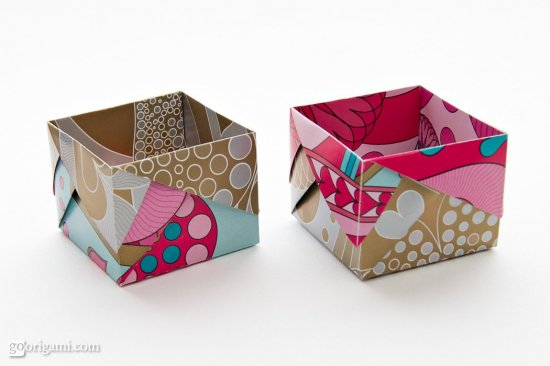
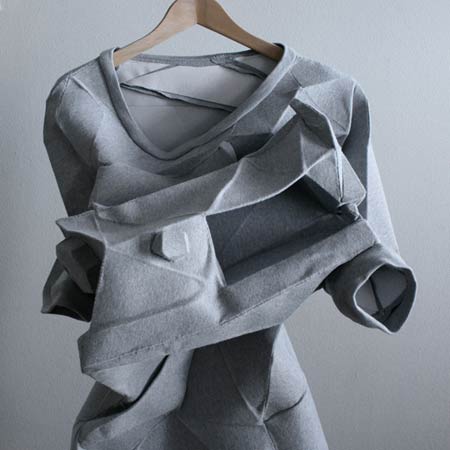
Inspiration: Origami

Hi again! Kim here! Today I thought I'd share some images and crafts that have inspired me this week. Hopefully you'll be inspired, too! With resources like Pinterest and Instagram, and tons of great crafty blogs at my fingertips, lately I've been piling up all sorts of inspirational photographs and projects. My list of DIY's grows longer and longer by the day. Here are a few great things I saw this week that got me thinkin' about foldin' some paper. I'm seriously thinking about making some origami roses to brighten up my desk at work!


1.// How cool are these origami clothes? Article found at Dezeen magazine. 2.// Origami Roses from bloomize. 3.// Origami Hana Rope Nexklace in Seafoam Green from Homako's etsy shop. 4.// Origami gift boxes from GoOrigami.5.// Origami Pendant from Origami Jewelry.


Check out MixedMethod for a themed inspiration post every Sunday!

Thanks for Reading!

Thursday, August 16, 2012

Bomb Cinnamon Rolls

Steph here. The other night, I got a craving for cinnamon rolls. Homemade ones. But we are out of yeast to make the kind that rise. Plus, they take too long to make. So I searched the internet (actually my husband Joe did) for a no yeast recipe. He found one! Here it is. Now this chica put a lot of time into photographing her creation. So enjoy her photogs. Here is one of hers:

They looks so good right? AMAZING. So I had to try my hand at it. Here is the recipe:

No Yeast Cinnamon Rolls

Yield: 12 rolls
Prep Time: 30 min
Cook Time: 20 min

Ingredients:

Filling:
4 tablespoons unsalted butter, at room temperature
1 cup packed dark brown sugar
3 teaspoons ground cinnamon

Dough:
2 cups bread or all-purpose flour, + more for rolling
2 tablespoons granulated white sugar
3 teaspoons baking powder
1 teaspoon salt
3 tablespoons unsalted butter, at room temperature
3/4 cup milk
1 large egg, beaten

Cream Cheese Frosting:
2 ounces cream cheese, at room temperature
2/3 cup powdered sugar
3 tablespoons milk or buttermilk

Directions:

1. Preheat the oven to 400 degrees F. Spray a muffin tin with nonstick spray.
2. Prepare the filling: In a small bowl, combine the filling ingredients with a fork until a crumbly mixture is formed.
3. Prepare the dough: In a large bowl, whisk together the flour, sugar, baking powder and salt. Use clean hands (or a pastry blender) to work the butter into the dry ingredients. Add the milk and the egg and stir to combine.
4. Roll the dough out on a floured surface into roughly shaped large rectangle (about 1/4-inch thick). Sprinkle the filling evenly over the surface of the dough, leaving a 1/2-inch border all the way around. Carefully roll up the rectangle (the dough will be soft). Use a sharp knife to cut 12 rolls. If you want smaller rolls, cut them a little smaller and you'll get 18. Carefully place the rolls in the prepared muffin tin.
5. Bake 20 to 25 minutes. While the cinnamon rolls are baking, prepare the frosting: Combine the cream cheese, powdered sugar and milk/buttermilk in a medium bowl. Use an electric mixer to combine. Add a little more milk if you wish to have a thinner frosting. Spread the frosting on top of warm rolls or drizzle on top. Serve warm.

 So I followed the recipe...more or less...and it was super easy! Here are the buns pre bake...


Here are the buns post bake, sans the homemade cream cheese icing on top! Worth the trip to the grocery store at 10:00 at night? I think so...
I urge you to try these. You won't regret it!

Tuesday, August 14, 2012

Semi-Homemade Beaded Jewelry

So, I should start this post by saying that I am NOT a beader. I aspire to be, but I'm not quite there yet. I decided to write this post to make the point that one need not have many skills or tools to make some simple and inexpensive beaded jewelry and have some fun in the process. This is not a craft about which you should be saying, "I could never do that."

You can find everything you need at a bead shop. If you're in Baltimore, D.C., or McClean, VA, check out Bedazzled. The entire store is filled with self-serve plates/trays of beads arranged in regions of the store by color. Tools, findings, cords/wires/chains, containers for your beads, and everything else you may need, plus some nice gift items, finished jewelry, and books can be found at this nifty store. I also love to go to the International Gem & Jewelry Show when it comes to town. On the other hand, you can always go to your local Michaels or A.C. Moore. Bedazzled, Michaels, and A.C. Moore all have great beading ideas/tips/information/how-to's on their sites.


If you don't want to design your own item, you can buy a beading kit. I am sure that this necklace came from a kit for kids. I made it at a birthday party when I was in elementary school! I can't believe it's still in one piece, but it has definitely stretched a bit too much (it's not exactly a choker anymore).


You also can choose one signature bead and make a super simple necklace with just one bead as a pendant. The two beads below are my most recent Bedazzled acquisitions.


You can also choose a few large beads and then use matching/complementary seed beads like the ones below.


Here's one of the more complicated things I've made in recent years:


I also want to share with you two pieces my mom made when I was a kid and I still wear to this day. Both incredibly chic, classic, and simple.


You can see here that there are only two colors of beads and that they increase in size from each end with the biggest in the middle.


This piece uses two sizes of the same color bead with five seed beads between each larger bead. You could just use the exact same bead all around and still have a cute piece.


There's one more incredibly simple project I made that I'd like to share. For all of you bead wearers out there, I know there has been a time or two when a necklace or bracelet fell to pieces. When you're lucky, you can recover all of the pieces (or most of them). I usually end up shoving the loose beads into an envelope, and if they look salvageable, I transfer them to my beading box. When I have time, I resurrect them into something new (and probably simpler).


So, don't feel overwhelmed! You can rescue injured jewelry, and you can make some really cool things with very little practice--just think what you could make if you do decide to dedicate yourself! For me, the hardest parts are not buying too many things in the store(s), threading the beads, and tying the knots. All of the above pieces use cord or wire and a clasp. I used small pliers for a few of the pieces, and for the pieces with seed beads, we used a beading needle.


Want an even easier project? Try earrings or bookmarks! It's always a nice feeling when you've made something yourself, even if that something doesn't require too much effort!

--Lael

PS. For some really cool DIY jewelry, see this Mixed Method post!